 |
 |
|
|

The Anderson Shelter was invented in 1938 by engineering duo Oscar Carl Kerrison and William Paterson. It was named after Sir John Anderson who was briefly in charge of Air Raid precautions before he became Chancellor of the Exchequer.
During World War II households needed protection against enemy air-raids.
If you had a garden the most practical solution was to build your own.
The shelter was designed to be shipped in kit form a bit like flat-pack furniture is today. The kit consisted of sheets of corrugated steel (some curved to make an arch), base, nuts & bolts, fixtures, instructions, and a spanner.
Before you constructed the shelter you had to dig a hole 3 - 4 feet deep and five-foot by 7.5 feet wide.
This would take a lot of digging and almost certainly ruin your back garden.
The shelter would be built from the bottom upwards starting by building the rectangular base at the bottom of the hole.
The sheets of corrugated iron would be fitted to the base and bolted together with the nuts and bolts provided and tightened with the kit spanner.
The earth from digging the hole would be piled on top of the shelter so that only the front side would be visible.
Hopefully, after all that hard work it would be bombproof.
Most people had to pay for their shelters but if you couldn't afford one the government would ship one for free.
The shelters must have been damp and cold. There was no door but you could improvise with a flap of sacking to keep the wind and rain out. The shelter would keep filling with water and would need pumping out.
By putting bunk beds inside the shelter a whole family could spend the night protected during enemy air-raids.
When the air-raid sirens warned of approaching enemy aircraft the family would pile into their shelters at the bottom of the garden and wait for the danger to pass.
The shelters proved to be incredibly strong with around 2.5 million being produced.
After the war, local councils collected the shelters. Some people liked them so much that they wanted to keep them to use as sheds.

Download and print out the templates on thin card. If your printer doesn't print on card then you can print on paper and glue onto card with a glue stick.
| Print out the templates. You can download them here. Take the first page to start work on the shelter. |  |
| Cut out the five pieces being careful to cut around the tabs. |  |
| Score the card along the dotted lines and fold. |  |
| Place some clear PVA craft glue on the longest tab and hold against the opposing face. |  |
| Put glue on the tabs for the side nearest the door and stick against the front panel. |  |
| Looking inside the model the tabs should look like the picture on the right. |  |
| Repeat with the remaining side and press until the glue adheres. Alternatively, you could use masking tape to hold until dry then remove. |  |
| Glue the two back pieces together with the printed faces outwards. |  |
| Glue the two front pieces together back to back so that the entrance lines up. |  |
| Place glue on the front end of the shelter. |  |
| Carefully adhere to the front piece to the shelter. Making sure the entrances lines up. |  |
| Put glue on the back of the shelter. |  |
| Fix the back panel to the shelter making sure the panel is central with the bottom edge lined up with the bottom edge of the shelter. |  |
| Leave the shelter part of the model to dry. |  |
| Take the second sheet of card. If not using a colour printer you can colour in the grass with a felt-tip pen. |  |
| Cut out the base and hole for the shelter. | 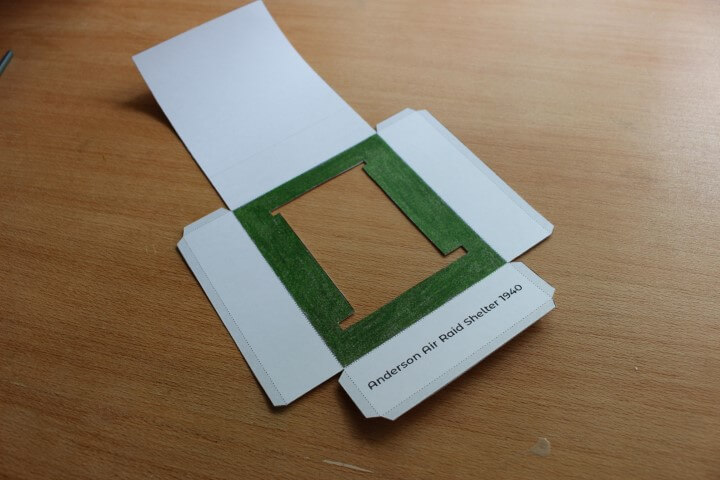 |
| Score the folds in the card and fold. |  |
| Glue the four corner tabs together to form a box shape. |  |
|
Allow the glue to dry and apply glue to the remaining tabs and adhere. Leave the base section to dry. |
 |
| Take the third and final sheet. If printed in black and white you can colour in the grass with a felt tip. |  |
| Cut out the shape including any tabs. |  |
| Score along the dotted lines and fold. |  |
| Place glue on tabs and adhere against the opposing face. Leave your model to dry. |  |
All being well you can now fit your shelter into the slot in the base. This represents the portion of the shelter that would have been underground.
Now place the grass-covered earth section of the model over your model. This represents the earth that came from the hole being heaped over the shelter. This provide more protection.
All three parts are designed to be removable so there is need no glue these together.
Congratulations you have constructed your own model Anderson Shelter.
Keywords: How to make a model anderson shelter, anderson shelter cardboard model, world war II anderson shelter, WW2, WW2, world war two, cut out modelLatest Posts |
| 27/04/20 |
| How to Make a Model Anderson Shelter |
| 25/04/20 |
| How to make a Model Roman Villa |
| 15/04/20 |
| How to Make a Tetrahedron |
| 07/04/20 |
| Octahedrons and how to draw their net |
| 17/11/15 |
| How to Create a Time Sheet in Excel |
| 15/11/15 |
| Handling time and dates in PHP |
| 03/02/15 |
| How to Enhance Photographs with the Gimp |
| 25/01/15 |
| How to Cook Pigeon |
| 25/01/15 |
| Telling the Time |
| 24/01/15 |
| An Old Travel Card |